Building Hadoop Cluster from scratch
Step 1: Use Virtual Box to create ubuntu 12.04 virtual machines. Step 2: Setup networking on Virtual Box and for the virtual machine Step 3: Network & Hostname check Step 4: Check and install ssh, vim, jdk Step 5: Create Hadoop Admin Step 6: Download and extract Hadoop Step 7: Log in as Hadoop Admin from base machine Step 8: Setting environment variables Step 9: Setting up HDFS and Hadoop processes Step 10: Start all processes Step 11: Check and start writing into HDFS Step 12: Setting SSH access for nodes Step 13: Writing a map reduce program Step 14: Running a map reduce program Step 15: Setting the recycle bin (trash) folder for HDFS Step 16: Moving from pseudo-distributed mode to fully distributed
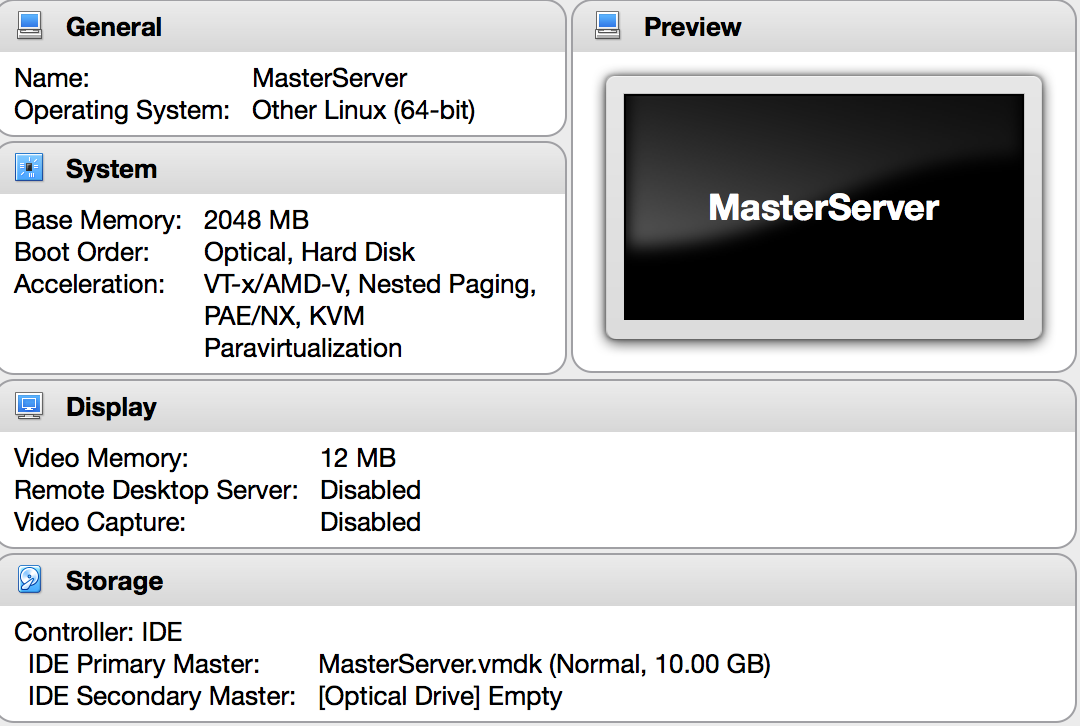
Step 1: Use Virtual Box to create ubuntu 12.04 virtual machines.
I have created a ubuntu virtual box as shown below.
Step 2: Setup networking on Virtual Box and for the virtual machine
A Quick look at Virtual Networking provided by the Virtual Box is given below.
Let’s look at the most commonly used variants that I have used.
Network Address Translation (NAT) Bridged networking Internal networking Host-only networking
Network Address Translation (NAT)
Network Address Translation (NAT) is the simplest way of accessing an external network from a virtual machine. Usually, it does not require any configuration on the host network and guest system. For this reason, it is the default networking mode in VirtualBox.
A virtual machine with NAT enabled acts much like a real computer that connects to the Internet through a router. The “router”, in this case, is the VirtualBox networking engine, which maps traffic from and to the virtual machine transparently. In VirtualBox this router is placed between each virtual machine and the host. This separation maximizes security since by default virtual machines cannot talk to each other.
The disadvantage of NAT mode is that, much like a private network behind a router, the virtual machine is invisible and unreachable from the outside internet; you cannot run a server this way unless you set up port forwarding
Bridged networking
With bridged networking, VirtualBox uses a device driver on your host system that filters data from your physical network adapter. This driver is therefore called a “net filter” driver. This allows VirtualBox to intercept data from the physical network and inject data into it, effectively creating a new network interface in software. When a guest is using such a new software interface, it looks to the host system as though the guest were physically connected to the interface using a network cable: the host can send data to the guest through that interface and receive data from it. This means that you can set up routing or bridging between the guest and the rest of your network.
Internal networking
Internal Networking is similar to bridged networking in that the VM can directly communicate with the outside world. However, the “outside world” is limited to other VMs on the same host which connect to the same internal network.
Even though technically, everything that can be done using internal networking can also be done using bridged networking, there are security advantages with internal networking. In bridged networking mode, all traffic goes through a physical interface of the host system. It is therefore possible to attach a packet sniffer (such as Wireshark) to the host interface and log all traffic that goes over it. If, for any reason, you prefer two or more VMs on the same machine to communicate privately, hiding their data from both the host system and the user, bridged networking therefore is not an option.
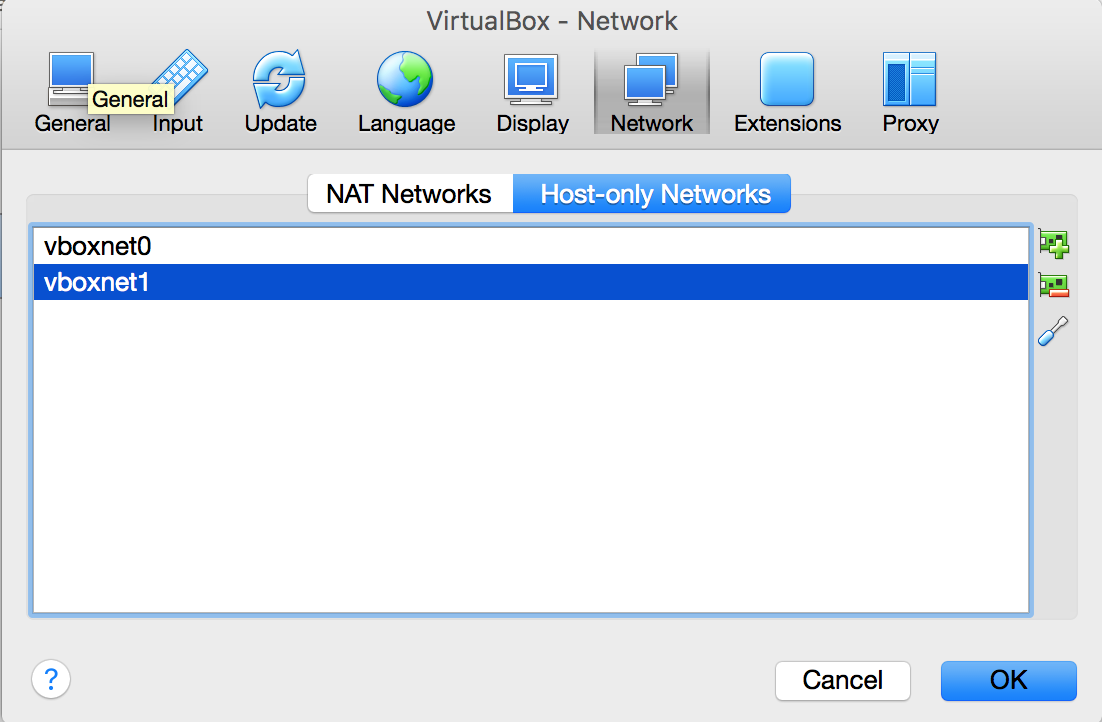
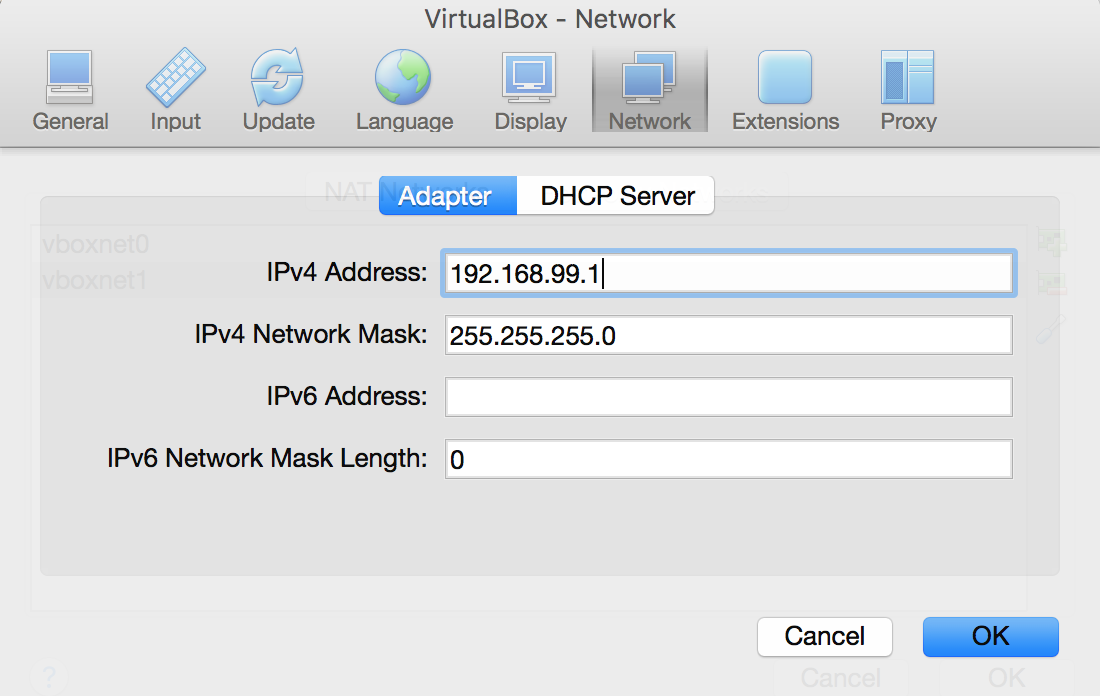
Host-only networking
Host-only networking is another networking mode that was added with version 2.2 of VirtualBox. It can be thought of as a hybrid between the bridged and internal networking modes: as with bridged networking, the virtual machines can talk to each other and the host as if they were connected through a physical Ethernet switch. Similarly, as with internal networking however, a physical networking interface need not be present, and the virtual machines cannot talk to the world outside the host since they are not connected to a physical networking interface.
Instead, when host-only networking is used, VirtualBox creates a new software interface on the host which then appears next to your existing network interfaces. In other words, whereas with bridged networking an existing physical interface is used to attach virtual machines to, with host-only networking a new “loopback” interface is created on the host. And whereas with internal networking, the traffic between the virtual machines cannot be seen, the traffic on the “loopback” interface on the host can be intercepted.
What is of interest here is Host-only networking.
The benefits are clear from the above explanation
- restricts access to your host machine’s actual network adapter
- helps to create a lab environment like setup where your machines will interact only with other machines in the same network
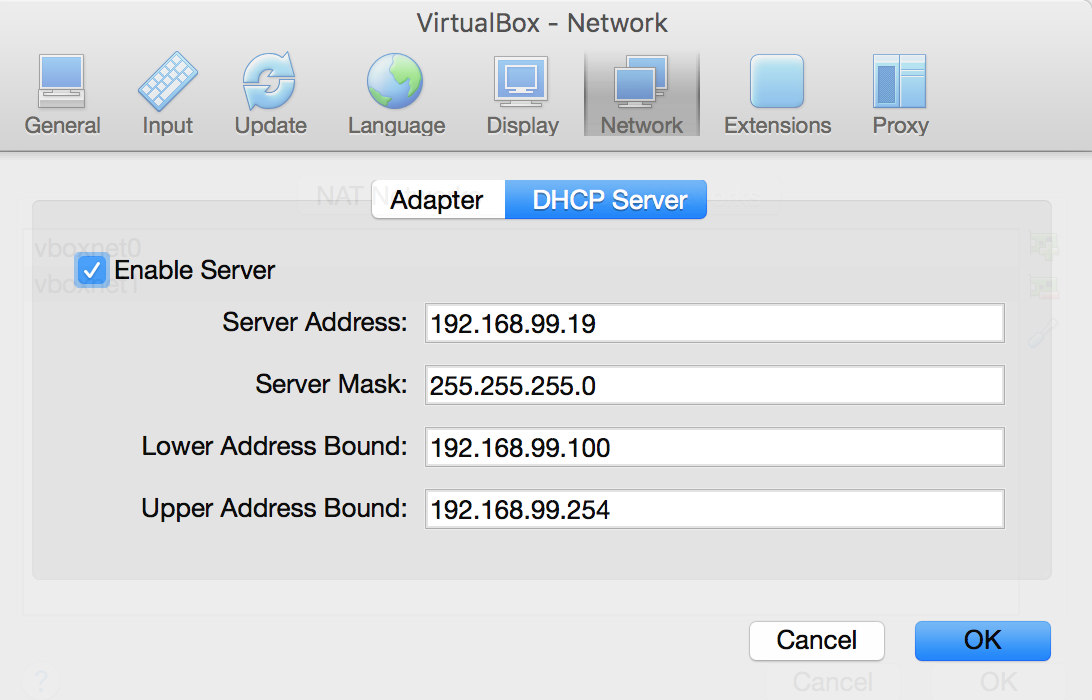
- not only does the host-only adapter allow virtual machines on your computer to be able to communicate with one another and the host machine, but it also acts as a DHCP server.
Now let’s start our hands on. You can read more on virtual box documentation and else where on the internet.
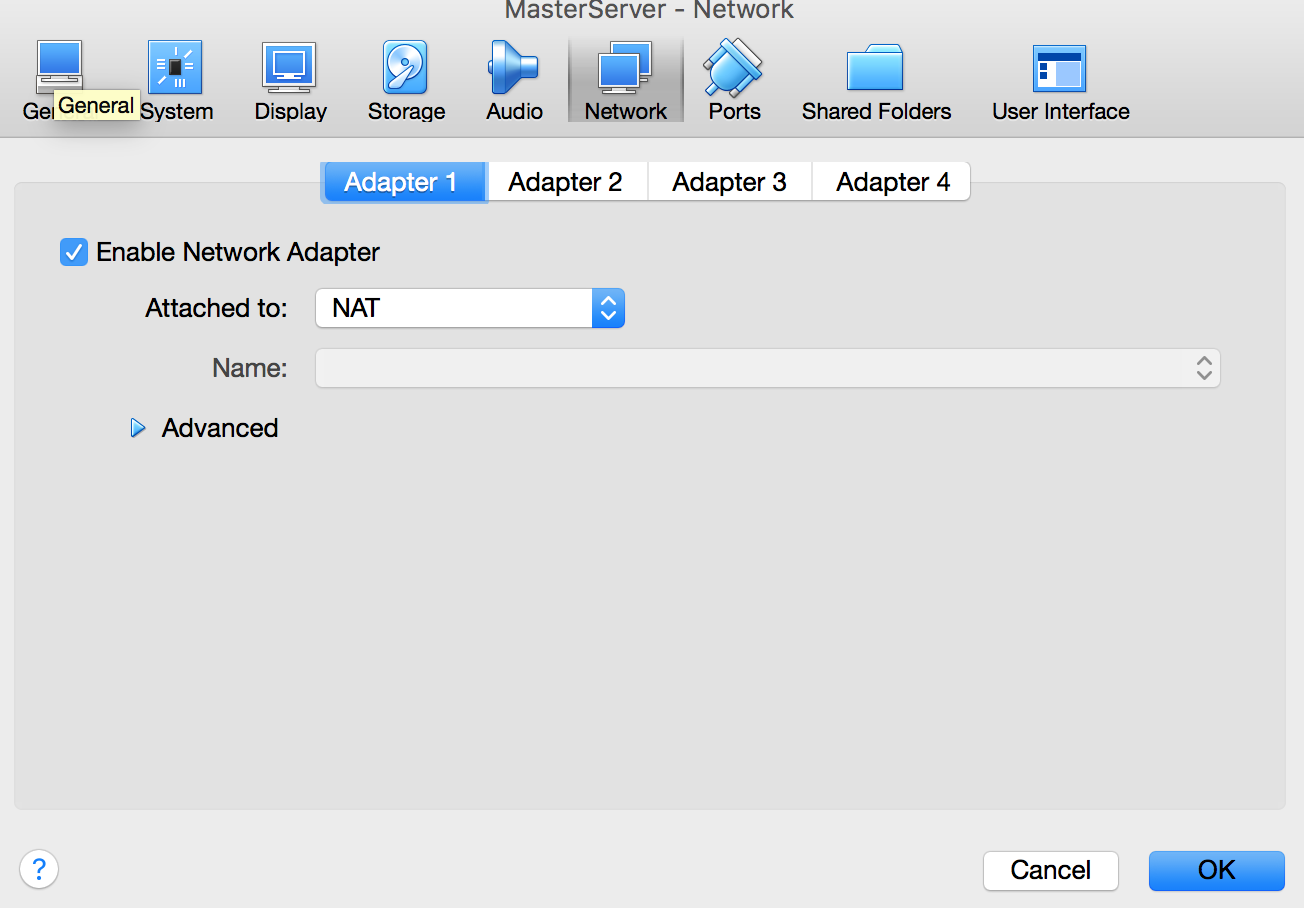
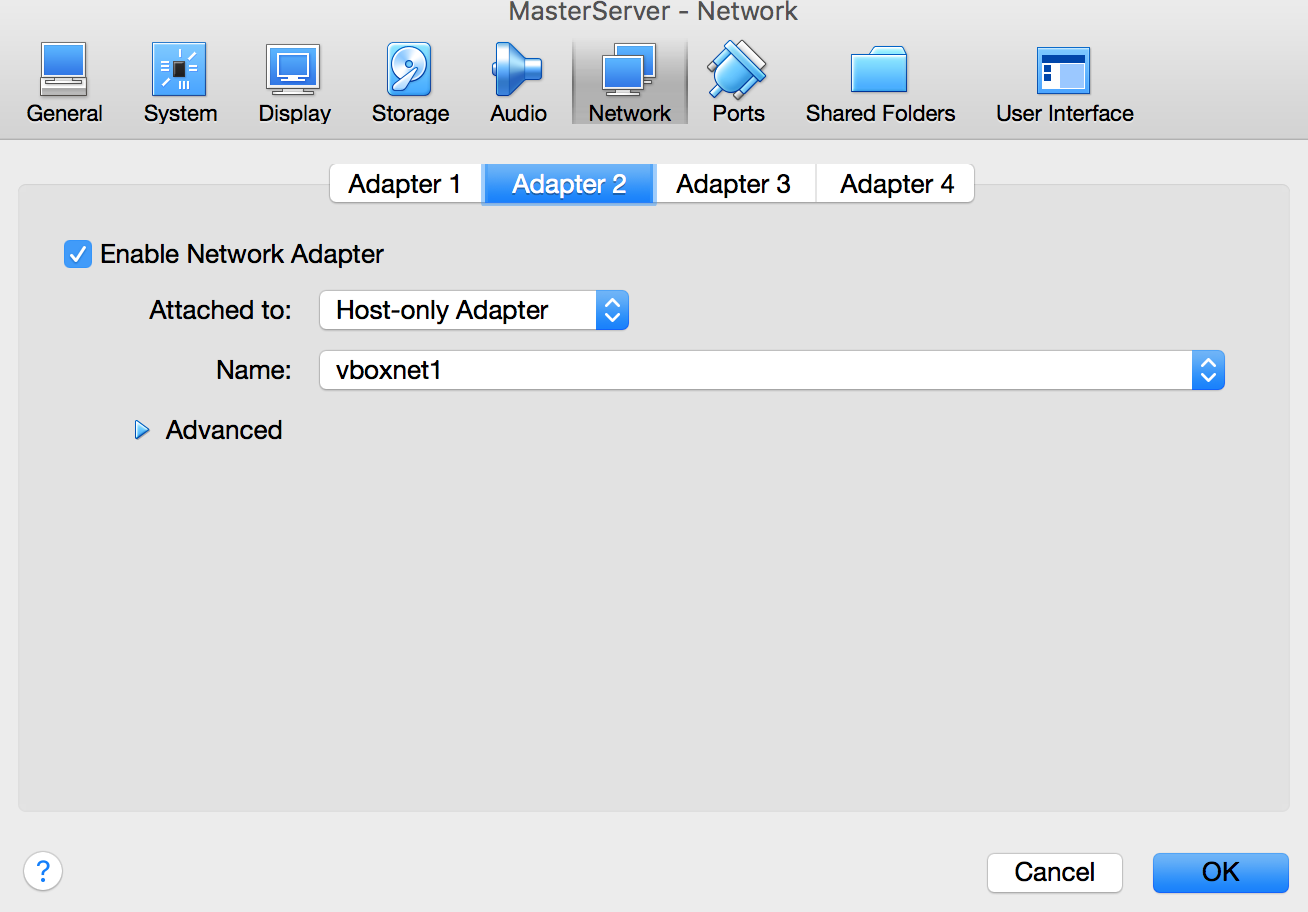
Once this is done attach the network adapters to the virtual machine
Click the virtual machine and select settings.
There were 4 slots available for my virtual machine.
NAT is for internet and Host-only for inter-machine communication.
Step 3: Network & Hostname check
Boot into the machine and check if ip has been configured by issuing ifconfig command.
This is how mine looks.
$ ifconfig eth0 Link encap:Ethernet HWaddr 08:00:27:07:04:23 inet addr:10.0.2.15 Bcast:10.0.2.255 Mask:255.255.255.0 inet6 addr: fe80::a00:27ff:fe07:423/64 Scope:Link
eth1 Link encap:Ethernet HWaddr 08:00:27:00:d4:33 inet addr:192.168.99.100 Bcast:192.168.99.255 Mask:255.255.255.0 inet6 addr: fe80::a00:27ff:fe00:d433/64 Scope:Link
lo Link encap:Local Loopback inet addr:127.0.0.1 Mask:255.0.0.0 inet6 addr: ::1/128 Scope:Host
If you find the network not created right, try restarting then add interface entries in interface file.
$ sudo vi /etc/network/interface
(or)
$ sudo gedit /etc/network/interface
#The loopback interface auto lo iface lo inet loopback
#The Primary network interface auto eth1 iface eth1 inet static address 192.168.99.100 netmask 255.255.255.0 network 192.168.99.0 broadcast 192.168.99.255
#The Secondary network interface auto eth0 iface eth0 inet dhcp
Save and exit. Not restart network interface.
$ sudo invoke-rc.d networking stop $ sudo invoke-rc.d networking start
Reopen terminal and now issue ifconfig and check.
Check if hostname is added in /etc/hosts If a machine name has been given during the os installation then that should come up in this file. For eg: this is how my hosts file look:
127.0.0.1 localhost 127.0.1.1 johne-server
If it is not there then add it.
Step 4: Check and install ssh, vim, jdk
Check and install SSH server, Vim and open jdk 7.
$ sudo apt-get install openssh-server $ sudo apt-get install vim
search for jdk
$ sudo apt-get install openjdk* $ sudo apt-get install openjdk-7-jdk
Step 5: Create Hadoop Admin
$ sudo addgroup hadoop
check by
$ more /etc/group
$ sudo adduser –ingroup hadoop hduser
check by
$ id hduser
Add as a sudoer
$ sudo visudo
Add this entry that is similar for root
hduser ALL=(ALL:ALL) ALL
Step 6: Download and extract Hadoop
Download Hadoop
$ cd /tmp $ wget https://archive.apache.org/dist/hadoop/common/hadoop-1.2.1/hadoop-1.2.1-bin.tar.gz
Place hadoop in the usual (best practice for downloads) directory
$ cd /usr/local $ sudo mv /tmp/hadoop-1.2.1-bin.tar.gz hadoop-1.2.1-bin.tar.gz $ sudo tar -xvf hadoop-1.2.1.tar.gz $ sudo ln -s hadoop.1.2.1 hadoop
Step 7: Log in as Hadoop Admin from base machine
$ su - hduser $ cd /usr/local $ sudo chown -R hduser:hadoop hadoop*
check by
$ ls -lr
From now on we will work only through the base machine’s terminal/shell as it makes a lot easier to manage the virtual machine. All the following steps are run as hduser.
Step 8: Setting environment variables
Find and browse where jdk resides
Check location of JDK
$ ls -lr /usr/lib/jvm/ total 4 drwxr-xr-x 7 root root 4096 Dec 8 00:54 java-7-openjdk-amd64 lrwxrwxrwx 1 root root 20 Nov 16 12:45 java-1.7.0-openjdk-amd64 -> java-7-openjdk-amd64
$ vi ~/.bashrc
export JAVA_HOME=/usr/lib/jvm/java-7-openjdk-amd64 export HADOOP_HOME=/usr/local/hadoop export PATH=$PATH:$HADOOP_HOME/bin
Hadoop 1.2.x throws a warning that $HADOOP_HOME is deprecated whenever a hadoop command is run.(I think this is because some versions of hadoop 1.x used HADOOP_PREFIX instead of HADOOP_HOME)
To get rid of this annoying warning message export HADOOP_HOME_WARN_SUPPRESS=TRUE
Re-run bash to reflect the variables in the current session itself.
$ exec bash
Now run and check a basic hadoop command.
$ hadoop -version
Step 9: Setting up HDFS and Hadoop processes
You could pick some sensible name for each hadoop process and assign a loopback address for it. (This is not a necessity but it makes a good practice)
update /etc/hosts
127.0.0.1 localhost 127.0.1.1 johne-server 127.0.1.2 nn-server 127.0.1.3 sn-server 127.0.1.4 jt-server 127.0.1.5 dn-server
Now add respective configuration.
Namenode’s metadata configuration location and other hdfs parameters are mentioned in hdfs-site.xml.
$ conf/hdfs-site.xml
<configuration>
<property>
<name>dfs.replication</name>
<value>1</value>
<description>Replication factor is 1 because it is a Pseudo distribution</description>
</property>
<property>
<name>dfs.name.dir</name>
<value>/hdfs_storage/name</value>
<description>Location of hdfs metadata. default is /tmp</description>
</property>
<property>
<name>dfs.data.dir</name>
<value>/hdfs_storage/data</value>
<description>Location of hdfs datablocks. default is /tmp</description>
</property>
</configuration>
Namenode’s server location and port are mentioned in core-site.xml
$ conf/core-site.xml
<configuration>
<property>
<name>fs.default.name</name>
<value>hdfs://nn-server:9000</value>
<description>This is for HDFS path and namenode</description>
</property>
</configuration>
Secondary namenode’s server location is mentioned in masters file.
$ conf/masters
sn-server
All hdfs nodes are mentioned in slaves file.
$ conf/slaves
dn-server
Job tracker process location is mentioned in mapred-site.xml file.
$ conf/mapred-site.xml
<configuration>
<property>
<name>mapred.job.tracker</name>
<value>jt-server:9001</value>
<description>This is the server and port for job tracker</description>
</property>
</configuration>
Now setup HDFS storage
$ sudo mkdir /hdfs_storage $ sudo chown -R hduser:hadoop hdfs_storage $ hadoop namenode -format
hduser@johne-server:/$ hadoop namenode -format Warning: $HADOOP_HOME is deprecated.
16/12/08 14:30:37 INFO namenode.NameNode: STARTUP_MSG: /************************************************************ STARTUP_MSG: Starting NameNode STARTUP_MSG: host = johne-server/127.0.1.1 STARTUP_MSG: args = [-format] STARTUP_MSG: version = 1.2.1 STARTUP_MSG: build = https://svn.apache.org/repos/asf/hadoop/common/branches/branch-1.2 -r 1503152; compiled by ‘mattf’ on Mon Jul 22 15:23:09 PDT 2013 STARTUP_MSG: java = 1.7.0_121 ************************************************************/ 16/12/08 14:30:38 INFO util.GSet: Computing capacity for map BlocksMap 16/12/08 14:30:38 INFO util.GSet: VM type = 64-bit 16/12/08 14:30:38 INFO util.GSet: 2.0% max memory = 1013645312 16/12/08 14:30:38 INFO util.GSet: capacity = 2^21 = 2097152 entries 16/12/08 14:30:38 INFO util.GSet: recommended=2097152, actual=2097152 16/12/08 14:30:38 INFO namenode.FSNamesystem: fsOwner=hduser 16/12/08 14:30:38 INFO namenode.FSNamesystem: supergroup=supergroup 16/12/08 14:30:38 INFO namenode.FSNamesystem: isPermissionEnabled=true 16/12/08 14:30:38 INFO namenode.FSNamesystem: dfs.block.invalidate.limit=100 16/12/08 14:30:38 INFO namenode.FSNamesystem: isAccessTokenEnabled=false accessKeyUpdateInterval=0 min(s), accessTokenLifetime=0 min(s) 16/12/08 14:30:38 INFO namenode.FSEditLog: dfs.namenode.edits.toleration.length = 0 16/12/08 14:30:38 INFO namenode.NameNode: Caching file names occuring more than 10 times 16/12/08 14:30:38 INFO common.Storage: Image file /hdfs_storage/name/current/fsimage of size 112 bytes saved in 0 seconds. 16/12/08 14:30:38 INFO namenode.FSEditLog: closing edit log: position=4, editlog=/hdfs_storage/name/current/edits 16/12/08 14:30:38 INFO namenode.FSEditLog: close success: truncate to 4, editlog=/hdfs_storage/name/current/edits 16/12/08 14:30:38 INFO common.Storage: Storage directory /hdfs_storage/name has been successfully formatted. 16/12/08 14:30:38 INFO namenode.NameNode: SHUTDOWN_MSG: /************************************************************ SHUTDOWN_MSG: Shutting down NameNode at johne-server/127.0.1.1 ************************************************************/
Step 10: Start all processes
You start name node, secondary name node and data node processes by running a single script - start-dfs.sh.
Type in the password whenever it waits for input.
hduser@johne-server:/usr/local/hadoop$ bin/start-dfs.sh Warning: $HADOOP_HOME is deprecated.
starting namenode, logging to /usr/local/hadoop-1.2.1/libexec/../logs/hadoop-hduser-namenode-johne-server.out The authenticity of host ‘dn-server (127.0.1.5)’ can’t be established. ECDSA key fingerprint is ************ Are you sure you want to continue connecting (yes/no)? yes dn-server: Warning: Permanently added ‘dn-server’ (ECDSA) to the list of known hosts. hduser@dn-server’s password: dn-server: Warning: $HADOOP_HOME is deprecated. dn-server: dn-server: starting datanode, logging to /usr/local/hadoop-1.2.1/libexec/../logs/hadoop-hduser-datanode-johne-server.out The authenticity of host ‘sn-server (127.0.1.3)’ can’t be established. ECDSA key fingerprint is *************. Are you sure you want to continue connecting (yes/no)? yes sn-server: Warning: Permanently added ‘sn-server’ (ECDSA) to the list of known hosts. hduser@sn-server’s password: sn-server: Warning: $HADOOP_HOME is deprecated. sn-server: sn-server: starting secondarynamenode, logging to /usr/local/hadoop-1.2.1/libexec/../logs/hadoop-hduser-secondarynamenode-johne-server.out
Check if the processes are running.
hduser@johne-server:/usr/local/hadoop$ jps 3716 SecondaryNameNode 3202 NameNode 3473 DataNode 3763 Jps
You start job tracker and task trackers by running a single script - start-mapred.sh
hduser@johne-server:/usr/local/hadoop$ bin/start-mapred.sh Warning: $HADOOP_HOME is deprecated.
starting jobtracker, logging to /usr/local/hadoop-1.2.1/libexec/../logs/hadoop-hduser-jobtracker-johne-server.out hduser@dn-server’s password: dn-server: Warning: $HADOOP_HOME is deprecated. dn-server: dn-server: starting tasktracker, logging to /usr/local/hadoop-1.2.1/libexec/../logs/hadoop-hduser-tasktracker-johne-server.out
hduser@johne-server:/usr/local/hadoop$ jps 3716 SecondaryNameNode 3202 NameNode 3473 DataNode 4071 TaskTracker 3817 JobTracker 4140 Jps
Step 11: Check and start writing into HDFS
A Safemode for Namenode is essentially a read-only mode for the HDFS cluster, where it does not allow any modifications to file system or blocks. Normally, Namenode disables safe mode automatically at the beginning. If required, HDFS could be placed in safe mode explicitly using bin/hadoop dfsadmin -safemode command.
Checking if Namenode is ready.
$ hadoop dfsadmin -safemode get Warning: $HADOOP_HOME is deprecated.
Safe mode is OFF
For the sake of experimenting, I pushed a file within the hadoop directory to hdfs.
$ hadoop fs -put ./CHANGES.txt ./input/sample1/
hduser@johne-server:/usr/local/hadoop$ hadoop dfs -lsr Warning: $HADOOP_HOME is deprecated.
drwxr-xr-x - hduser supergroup 0 2017-01-02 22:53 /user/hduser/input -rw-r–r– 1 hduser supergroup 493744 2017-01-02 22:53 /user/hduser/input/sample1
Note that hadoop dfs and hadoop fs are the same.
Browse to http://nn-server:50070 to view the namenode interface.
Using the command line you could take a consice report.
$ hadoop dfsadmin -report Warning: $HADOOP_HOME is deprecated.
Configured Capacity: 8561967104 (7.97 GB) Present Capacity: 5450768384 (5.08 GB) DFS Remaining: 5450219520 (5.08 GB) DFS Used: 548864 (536 KB) DFS Used%: 0.01% Under replicated blocks: 0 Blocks with corrupt replicas: 0 Missing blocks: 0
Datanodes available: 1 (1 total, 0 dead)
Name: 127.0.0.1:50010 Decommission Status : Normal Configured Capacity: 8561967104 (7.97 GB) DFS Used: 548864 (536 KB) Non DFS Used: 3111198720 (2.9 GB) DFS Remaining: 5450219520(5.08 GB) DFS Used%: 0.01% DFS Remaining%: 63.66% Last contact: Mon Jan 02 23:22:39 IST 2017
Step 12: Setting SSH access for nodes
We already have ssh server installed on this node and we have used passwords to authenticate the ssh session.
But this manual intervention of typing user readable passwords every time is dull and repetitive task.
So what we can do is try the more secure Key-based SSH authentication instead of password.
Short note on SSH key-based authentication
- SSH keys are a matching set of cryptographic keys which can be used for authentication.
- Each set contains a public and a private key. The public key can be shared freely without concern, while the private key must be vigilantly guarded and never exposed to anyone.
- A number cryptographic algorithms can be used to generate SSH keys, including RSA, DSA, and ECDSA. RSA keys are generally preferred and are the default key type.
-
To authenticate your local machine with remote server using SSH keys, a user must have an SSH key pair on their local machine.
-
On the remote server, the public key must be copied to a file within the user’s home directory at ~/.ssh/authorized_keys. This file contains a list of public keys, one-per-line, that are authorized to log into this account.
-
When a client connects to the host, wishing to use SSH key authentication, it will inform the server of this intent and will tell the server which public key to use.
-
The server then check its authorized_keys file for the public key, generate a random string and encrypts it using the public key. This encrypted message can only be decrypted with the associated private key.
-
The server will send this encrypted message to the client to test whether they actually have the associated private key.
-
Upon receipt of this message, the client will decrypt it using the private key and combine the random string that is revealed with a previously negotiated session ID.
-
It then generates an MD5 hash of this value and transmits it back to the server.
-
The server already had the original message and the session ID, so it can compare an MD5 hash generated by those values and determine that the client must have the private key.
Since in our scenario we are authenticating localhost against localhost within the same machine, it’s just a matter of creating the keys and copying it to the authorized_keys within the same machine.
More notes on ssh here
$ ls -lrta .ssh total 12 drwx—— 2 hduser hadoop 4096 Dec 8 14:38 . drwxr-xr-x 4 hduser hadoop 4096 Dec 8 14:38 .. -rw-r–r– 1 hduser hadoop 444 Dec 8 14:38 known_hosts
To generate an RSA key pair with no password
$ ssh-keygen -t rsa -P “” Generating public/private rsa key pair. Enter file in which to save the key (/home/hduser/.ssh/id_rsa): Your identification has been saved in /home/hduser/.ssh/id_rsa. Your public key has been saved in /home/hduser/.ssh/id_rsa.pub.
This procedure has generated an RSA SSH key pair, located in the .ssh hidden directory within your user’s home directory. These files are: ~/.ssh/id_rsa: The private key. DO NOT SHARE THIS FILE! ~/.ssh/id_rsa.pub: The associated public key. This can be shared freely without consequence.
$ cp .ssh/id_rsa.pub .ssh/authorized_keys
Try ssh from base machine to any hostname mentioned in hosts file.
$ ssh nn-server
if it works then it’s set up right.
If the above works then you could stop all services and again start it and see the difference.
hduser@johne-server:/usr/local/hadoop$ start-dfs.sh starting namenode, logging to /usr/local/hadoop-1.2.1/libexec/.. dn-server: starting datanode, logging to /usr/local/hadoop-1.2.1/libexec/.. sn-server: starting secondarynamenode, logging to /usr/local/hadoop-1.2.1/libexec/../
hduser@johne-server:/usr/local/hadoop$ start-mapred.sh starting jobtracker, logging to /usr/local/hadoop-1.2.1/libexec/.. dn-server: starting tasktracker, logging to /usr/local/hadoop-1.2.1/libexec/..
Step 13: Writing a map reduce program
Map reduce library comes in 2 variants - the old and the new.
org.apache.hadoop.mapred is the older API and org.apache.hadoop.mapreduce is the new one. And it was done to allow programmers write MapReduce jobs in a more convenient, easier and sophisticated fashion.
First let’s try the old API.
Let’s take the most famous word count program as an example.
Mapper -> Reducer paradigm is not a part of discussion here.
You need to setup eclipse workspace on your base machine (because it’s the most convenient), get the relevant jars from the hadoop distribution (just download hadoop again onto the base machine and look for jars inside)
package wordcount.v1;

import java.io.IOException;
import java.util.Iterator;
import java.util.StringTokenizer;

import org.apache.hadoop.fs.Path;
import org.apache.hadoop.io.IntWritable;
import org.apache.hadoop.io.LongWritable;
import org.apache.hadoop.io.Text;
import org.apache.hadoop.mapred.FileInputFormat;
import org.apache.hadoop.mapred.FileOutputFormat;
import org.apache.hadoop.mapred.JobClient;
import org.apache.hadoop.mapred.JobConf;
import org.apache.hadoop.mapred.MapReduceBase;
import org.apache.hadoop.mapred.Mapper;
import org.apache.hadoop.mapred.OutputCollector;
import org.apache.hadoop.mapred.Reducer;
import org.apache.hadoop.mapred.Reporter;
import org.apache.hadoop.mapred.TextInputFormat;
import org.apache.hadoop.mapred.TextOutputFormat;

public class WordCount {

 public static class Map extends MapReduceBase implements Mapper<LongWritable, Text, Text, IntWritable> {
  private final static IntWritable one = new IntWritable(1);
  private Text word = new Text();

  public void map(LongWritable key, Text value, OutputCollector<Text, IntWritable> output, Reporter reporter) throws IOException {
   String line = value.toString();
   StringTokenizer tokenizer = new StringTokenizer(line);
   while (tokenizer.hasMoreTokens()) {
    word.set(tokenizer.nextToken());
    output.collect(word, one);
   }
  }
 }

 public static class Reduce extends MapReduceBase implements Reducer<Text, IntWritable, Text, IntWritable> {
  public void reduce(Text key, Iterator<intwritable> values, OutputCollector<Text, IntWritable> output, Reporter reporter) throws IOException {
   int sum = 0;
   while (values.hasNext()) {
    sum += values.next().get();
   }
   output.collect(key, new IntWritable(sum));
  }
 }

 public static void main(String[] args) throws Exception {
  JobConf conf = new JobConf(WordCount.class);
  conf.setJobName("wordcount");

  conf.setOutputKeyClass(Text.class);
  conf.setOutputValueClass(IntWritable.class);

  conf.setMapperClass(Map.class);
  conf.setCombinerClass(Reduce.class);
  conf.setReducerClass(Reduce.class);

  conf.setInputFormat(TextInputFormat.class);
  conf.setOutputFormat(TextOutputFormat.class);

  FileInputFormat.setInputPaths(conf, new Path(args[0]));
  FileOutputFormat.setOutputPath(conf, new Path(args[1]));

  JobClient.runJob(conf);
 }
}
Let’s get the mapred API v2 also ready. Steps on making changes to your code is given here.
package wordcount.v2;

import java.io.IOException;
import java.util.StringTokenizer;

import org.apache.hadoop.conf.Configuration;
import org.apache.hadoop.fs.Path;
import org.apache.hadoop.io.IntWritable;
import org.apache.hadoop.io.Text;
import org.apache.hadoop.mapreduce.Job;
import org.apache.hadoop.mapreduce.Mapper;
import org.apache.hadoop.mapreduce.Reducer;
import org.apache.hadoop.mapreduce.lib.input.FileInputFormat;
import org.apache.hadoop.mapreduce.lib.output.FileOutputFormat;

public class WordCount {

 public static class TokenizerMapper extends Mapper<Object, Text, Text, IntWritable> {

  private final static IntWritable one = new IntWritable(1);
  private Text word = new Text();

  public void map(Object key, Text value, Context context) throws IOException, InterruptedException {
   StringTokenizer itr = new StringTokenizer(value.toString());
   while (itr.hasMoreTokens()) {
    word.set(itr.nextToken());
    context.write(word, one);
   }
  }
 }

 public static class IntSumReducer extends Reducer<Text, IntWritable, Text, IntWritable> {
  private IntWritable result = new IntWritable();

  public void reduce(Text key, Iterable<IntWritable> values, Context context) throws IOException, InterruptedException {
   int sum = 0;
   for (IntWritable val : values) {
    sum += val.get();
   }
   result.set(sum);
   context.write(key, result);
  }
 }

 public static void main(String[] args) throws Exception {
  Configuration conf = new Configuration();
  Job job = Job.getInstance(conf, "wordcount");
  job.setJarByClass(WordCount.class);
  job.setMapperClass(TokenizerMapper.class);
  job.setCombinerClass(IntSumReducer.class);
  job.setReducerClass(IntSumReducer.class);
  job.setOutputKeyClass(Text.class);
  job.setOutputValueClass(IntWritable.class);
  FileInputFormat.addInputPath(job, new Path(args[0]));
  FileOutputFormat.setOutputPath(job, new Path(args[1]));
  System.exit(job.waitForCompletion(true) ? 0 : 1);
 }
}
Step 14: Running a map reduce program
We had already pushed a text file into HDFS at /user/hduser/input/sample1. Extract the project from eclipse as a normal jar file (not as executable jar) and upload it into the virtual machine.
Run the jar Command is $ hadoop jar [jar file] [class name] [input folder] [output folder]
So to run the v1 API - $ hadoop jar mr.jar wordcount.v1.WordCount /user/hduser/input /user/hduser/output2
For v2 API - $ hadoop jar mr.jar wordcount.v2.WordCount /user/hduser/input /user/hduser/output3
mr.jar is the jar name given by me. Make sure the output folder location given is new and not an existing one. Output of the code prints on the screen and it usually looks like this -
17/01/03 10:34:01 WARN mapred.JobClient: Use GenericOptionsParser for parsing the arguments. Applications should implement Tool for the same. 17/01/03 10:34:01 INFO util.NativeCodeLoader: Loaded the native-hadoop library 17/01/03 10:34:01 WARN snappy.LoadSnappy: Snappy native library not loaded 17/01/03 10:34:01 INFO mapred.FileInputFormat: Total input paths to process : 1 17/01/03 10:34:01 INFO mapred.JobClient: Running job: job_201701031028_0003 17/01/03 10:34:02 INFO mapred.JobClient: map 0% reduce 0% 17/01/03 10:34:12 INFO mapred.JobClient: map 100% reduce 0% 17/01/03 10:34:20 INFO mapred.JobClient: map 100% reduce 33% 17/01/03 10:34:22 INFO mapred.JobClient: map 100% reduce 100% 17/01/03 10:34:23 INFO mapred.JobClient: Job complete: job_201701031028_0003 17/01/03 10:34:23 INFO mapred.JobClient: Counters: 30 17/01/03 10:34:23 INFO mapred.JobClient: Job Counters 17/01/03 10:34:23 INFO mapred.JobClient: Launched reduce tasks=1 17/01/03 10:34:23 INFO mapred.JobClient: SLOTS_MILLIS_MAPS=15415 17/01/03 10:34:23 INFO mapred.JobClient: Total time spent by all reduces waiting after reserving slots (ms)=0 17/01/03 10:34:23 INFO mapred.JobClient: Total time spent by all maps waiting after reserving slots (ms)=0 17/01/03 10:34:23 INFO mapred.JobClient: Launched map tasks=2 17/01/03 10:34:23 INFO mapred.JobClient: Data-local map tasks=2 17/01/03 10:34:23 INFO mapred.JobClient: SLOTS_MILLIS_REDUCES=10070 17/01/03 10:34:23 INFO mapred.JobClient: File Input Format Counters 17/01/03 10:34:23 INFO mapred.JobClient: Bytes Read=496728 17/01/03 10:34:23 INFO mapred.JobClient: File Output Format Counters 17/01/03 10:34:23 INFO mapred.JobClient: Bytes Written=178730 17/01/03 10:34:23 INFO mapred.JobClient: FileSystemCounters 17/01/03 10:34:23 INFO mapred.JobClient: FILE_BYTES_READ=836193 17/01/03 10:34:23 INFO mapred.JobClient: HDFS_BYTES_READ=496928 17/01/03 10:34:23 INFO mapred.JobClient: FILE_BYTES_WRITTEN=1838566 17/01/03 10:34:23 INFO mapred.JobClient: HDFS_BYTES_WRITTEN=178730 17/01/03 10:34:23 INFO mapred.JobClient: Map-Reduce Framework 17/01/03 10:34:23 INFO mapred.JobClient: Map output materialized bytes=836199 17/01/03 10:34:23 INFO mapred.JobClient: Map input records=12484 17/01/03 10:34:23 INFO mapred.JobClient: Reduce shuffle bytes=836199 17/01/03 10:34:23 INFO mapred.JobClient: Spilled Records=126490 17/01/03 10:34:23 INFO mapred.JobClient: Map output bytes=709697 17/01/03 10:34:23 INFO mapred.JobClient: Total committed heap usage (bytes)=294723584 17/01/03 10:34:23 INFO mapred.JobClient: CPU time spent (ms)=2840 17/01/03 10:34:23 INFO mapred.JobClient: Map input bytes=493744 17/01/03 10:34:23 INFO mapred.JobClient: SPLIT_RAW_BYTES=200 17/01/03 10:34:23 INFO mapred.JobClient: Combine input records=0 17/01/03 10:34:23 INFO mapred.JobClient: Reduce input records=63245 17/01/03 10:34:23 INFO mapred.JobClient: Reduce input groups=13606 17/01/03 10:34:23 INFO mapred.JobClient: Combine output records=0 17/01/03 10:34:23 INFO mapred.JobClient: Physical memory (bytes) snapshot=418054144 17/01/03 10:34:23 INFO mapred.JobClient: Reduce output records=13606 17/01/03 10:34:23 INFO mapred.JobClient: Virtual memory (bytes) snapshot=3335131136 17/01/03 10:34:23 INFO mapred.JobClient: Map output records=63245
To check the output,
hduser@johne-server:~$ hadoop dfs -lsr /user/hduser/output2 -rw-r–r– 1 hduser supergroup 0 2017-01-03 10:39 /user/hduser/output2/_SUCCESS drwxr-xr-x - hduser supergroup 0 2017-01-03 10:39 /user/hduser/output2/_logs drwxr-xr-x - hduser supergroup 0 2017-01-03 10:39 /user/hduser/output2/_logs/history -rw-r–r– 1 hduser supergroup 13927 2017-01-03 10:39 /user/hduser/output2/_logs/history/job_201701031028_0004_1483420165891_hduser_word+count -rw-r–r– 1 hduser supergroup 47904 2017-01-03 10:39 /user/hduser/output2/_logs/history/job_201701031028_0004_conf.xml -rw-r–r– 1 hduser supergroup 178730 2017-01-03 10:39 /user/hduser/output2/part-r-00000
The presence of _SUCCESS file denotes that it was successful. Explore the results by $ hadoop dfs -cat /user/hduser/output2/part-r-00000 The output files will be spread out into different part files based on how many reducers have run.
Since we had only 1 reducer we have just one file.
Step 15: Setting the recycle bin (trash) folder for HDFS
When a file is deleted by a user or an application, it is not immediately removed from HDFS.
Instead, HDFS moves it to a trash directory (each user has its own trash directory under /user/[username]/.Trash).
The file can be restored quickly as long as it remains in trash. Most recent deleted files are moved to the current trash directory (/user/[username]/.Trash/Current), and in a configurable interval, HDFS creates checkpoints (under /user/[username]/.Trash/[date]) for files in current trash directory and deletes old checkpoints when they are expired. After the expiry of its life in trash, the NameNode deletes the file from the HDFS namespace.
fs.trash.interval - Currently, the trash feature is disabled by default (deleting files without storing in trash). User can enable this feature by setting a value greater than zero for parameter
fs.trash.interval (in core-site.xml). - This value tells the NameNode how long a checkpoint will be expired and removed from HDFS. - In addition, user can configure an appropriate time to tell NameNode how often to create checkpoints in trash (the parameter stored as fs.trash.checkpoint.interval in core-site.xml). So without enabling the trash feature all files deleted will be removed and is unrecoverable. So it is advised to enable the trash. No need to restart any services when this value is modified.
fs.trash.checkpoint.interval - specifies how long (in minutes) the NameNode waits before running a thread to manage checkpoints. The NameNode deletes checkpoints that are older than fs.trash.interval and creates a new checkpoint from /user/${username}/.Trash/Current. - this value should be smaller or equal to fs.trash.interval.
For eg: fs.trash.interval = 360 (deletion interval = 6 hours) fs.trash.checkpoint.interval = 60 (emptier interval = 1 hour) This causes the NameNode to create a new checkpoint every hour and to delete checkpoints that have existed longer than 6 hours.
Add entry to core-site.xml
<property>
    <name>fs.trash.interval</name>
    <value>5</value>
    <description>This is the 5 minute waiting time in trash</description>
</property>
Now delete a file $ hadoop dfs -rmr /user/hduser/output/_logs/history
You will notice that the below directory has been created /user/hduser/.Trash/Current/user/hduser/output/_logs/history
After sometime the above content would have moved to a checkpoint location (based on when that checkpointing thread ran) /user/hduser/.Trash/1701141630/user/hduser/output/_logs/history
To skip the trash all together $ hadoop fs -rm -skipTrash /path/to/permanently/delete
To cause the checkpointing thread (the thread that creates new checkpoints and deletes old ones) to run immediately and not based on fs.trash.checkpoint.interval use $ hadoop fs -expunge
Step 16: Moving from pseudo-distributed mode to fully distributed
Let’s create 2 more virtual machines by cloning the current one.
Make sure to check the checkbox that states to reinitialize the mac address of all network cards. We will create the below distribution - MasterServer (192.168.99.100): namenode, tasktracker, datanode SlaveServer-1 (192.168.99.101): jobtracker, tasktracker, datanode SlaveServer-2 (192.168.99.102): secondary namenode, tasktracker, datanode
If the VM’s are initialized correctly then we shouldn’t be having any trouble setting the IP addresses as it would get automatically done. Also none of the set ups needs to be done. We already have the user accounts, hadoop config files, ssh keys in all the machines. Only thing left is to change the configurations accordingly.
/etc/hosts file configuration on all the 3 machines needs to look alike:
127.0.0.1 localhost 192.168.99.100 master-server nn-server dn-server-1 192.168.99.102 slave-server-2 sn-server dn-server-3 192.168.99.101 slave-server-1 jt-server dn-server-2
master-server, slave-server-2, slave-server-1 are the respective hostnames of those machines. Make sure these are mentioned in the hosts file along with the alias names.
Configuration on MasterServer (192.168.99.100):
hdfs-site.xml
<?xml version="1.0"?>
<?xml-stylesheet type="text/xsl" href="configuration.xsl"?>

<!-- Put site-specific property overrides in this file. -->

<configuration>
        <property>
                <name>dfs.replication</name>
                <value>3</value>
                <description>Replication factor is 1 because it is a Pseudo distribution</description>
        </property>
        <property>
                <name>dfs.name.dir</name>
                <value>/hdfs_storage/name</value>
                <description>Determines where on the local filesystem the DFS name node
                should store the name table.  If this is a comma-delimited list
                of directories then the name table is replicated in all of the
                directories, for redundancy.Default is /tmp</description>
        </property>
        <property>
                <name>dfs.data.dir</name>
                <value>/hdfs_storage/data</value>
                <description>Determines where on the local filesystem an DFS data node
                should store its blocks.  If this is a comma-delimited
                list of directories, then data will be stored in all named
                directories, typically on different devices.
                Directories that do not exist are ignored.
                Default is /tmp</description>
        </property>
        <property>
                <name>dfs.http.address</name>
                <value>nn-server:50070</value>
                <description>The address and the base port where the dfs namenode web ui will listen on. Better to mention this as it enables us to know on which port the web UI is running else it picks a random port for this. </description>
        </property>
        <property>
                <name>dfs.secondary.http.address</name>
                <value>sn-server:50090</value>
                <description>This is where SNN will be pinged</description>
        </property>
</configuration>
core-site.xml
<?xml version="1.0"?>
<?xml-stylesheet type="text/xsl" href="configuration.xsl"?>

<!-- Put site-specific property overrides in this file. -->

<configuration>
        <property>
                <name>fs.default.name</name>
                <value>hdfs://nn-server:9000</value>
                <description>This is for HDFS path and namenode</description>
        </property>
        <property>
                <name>fs.trash.interval</name>
                <value>5</value>
                <description>This is the 5 minute waiting time in trash</description>
        </property>
</configuration>
masters file
sn-server
slaves file
dn-server-1
dn-server-2
dn-server-3
mapred-site.xml
<?xml version="1.0"?>
<?xml-stylesheet type="text/xsl" href="configuration.xsl"?>

<!-- Put site-specific property overrides in this file. -->

<configuration>
        <property>
                <name>mapred.job.tracker</name>
                <value>jt-server:9001</value>
                <description>This is the server and port for job tracker</description>
        </property>
</configuration>
Configurations on SlaveServer-1 (192.168.99.101):
hdfs-site.xml
<?xml version="1.0"?>
<?xml-stylesheet type="text/xsl" href="configuration.xsl"?>

<!-- Put site-specific property overrides in this file. -->

<configuration>
        <property>
                <name>dfs.data.dir</name>
                <value>/hdfs_storage/data</value>
                <description>Location of hdfs datablocks. default is /tmp</description>
        </property>
</configuration>
core-site.xml
<?xml version="1.0"?>
<?xml-stylesheet type="text/xsl" href="configuration.xsl"?>

<!-- Put site-specific property overrides in this file. -->

<configuration>
        <property>
                <name>fs.default.name</name>
                <value>hdfs://nn-server:9000</value>
                <description>This is for HDFS path and namenode</description>
        </property>
</configuration>
mapred-site.xml
<?xml version="1.0"?>
<?xml-stylesheet type="text/xsl" href="configuration.xsl"?>

<!-- Put site-specific property overrides in this file. -->

<configuration>
        <property>
                <name>mapred.job.tracker</name>
                <value>jt-server:9001</value>
                <description>This is the server and port for job tracker</description>
        </property>
</configuration>
Configurations on SlaveServer-2 (192.168.99.102):
hdfs-site.xml
<?xml version="1.0"?>
<?xml-stylesheet type="text/xsl" href="configuration.xsl"?>

<!-- Put site-specific property overrides in this file. -->

<configuration>
        <property>
                <name>fs.checkpoint.edits.dir</name>
                <value>/hdfs_storage/ssnedits</value>
                <description>Edits directory for SSN (this machine) </description>
        </property>
        <property>
                <name>fs.checkpoint.dir</name>
                <value>/hdfs_storage/ssnfsi</value>
                <description>File system image directory for SSN (this machine) </description>
        </property>
        <property>
                <name>fs.checkpoint.period</name>
                <value>600</value>
                <description>Every 10 mins SSN will go to NN for checkpointing</description>
        </property>
        <property>
                <name>dfs.data.dir</name>
                <value>/hdfs_storage/data</value>
                <description>Location of hdfs datablocks. default is /tmp</description>
        </property>
</configuration>
core-site.xml
<?xml version="1.0"?>
<?xml-stylesheet type="text/xsl" href="configuration.xsl"?>

<!-- Put site-specific property overrides in this file. -->

<configuration>
        <property>
                <name>fs.default.name</name>
                <value>hdfs://nn-server:9000</value>
                <description>This is for HDFS path and namenode</description>
        </property>
</configuration>
mapred-site.xml
<?xml version="1.0"?>
<?xml-stylesheet type="text/xsl" href="configuration.xsl"?>

<!-- Put site-specific property overrides in this file. -->

<configuration>
        <property>
                <name>mapred.job.tracker</name>
                <value>jt-server:9001</value>
                <description>This is the server and port for job tracker</description>
        </property>
</configuration>
I started all the services and was successful in running a map reduce job.
Note that the web UI will be up for namenode at nn-server:50070 and for datanodes (say for dn-server-1) at dn-server-1:50075/browseDirectory.jsp?dir=/